13 Central Drive, Burleigh Heads Queensland 4200

Phone: 1800 223 626

DIY Cutting Your Foam

We have compared many cutting methods, the results, advantages, disadvantages and tips.
Understanding the possibilities of your foam will help complete your next project.

*The DIY cutting methods are only used as a guide, not as an guaranteed result.
As there is many material, tooling and user variables.

Edge guides, templates, measurements and test cuts are recommended for best results.

Professionally Converted by PJ Bowers

Tips: Consider sheet yield, quantity and a one-off drawing fee when requesting a quote.

Suitable for: Best of foam tolerances and production of many pieces and custom designs.

Advantages: large scale, high quantity production with CNC machine precision, any shape variable depth routing etc can be easily achieved.

DIY cutting comparison

*Image from left to right:

1. Serrated bread knife cut

2. Stanley box knife cut

3. Circular saw cut

4. Hand held router and circular saw

Box Cutter

Tips: An extended box knife can work better than a utility knife, as you will typically need a longer cutting edge for foam, this is to reduce the required amount of passes.
 
Advantages: Quick, simple, affordable method. Will create a good cut, no fuss cut for most basic applications.
 
Disadvantages: High densities and thicker foams may require multiple passes for a clean cut without tearing. However more passes increases the chance of small lips and an edge that is not square, if the blade begins to move slightly.

Even with guides, templates, fences etc the blade’s angle can become more inconsistent as the cut becomes deeper.

Hand Router

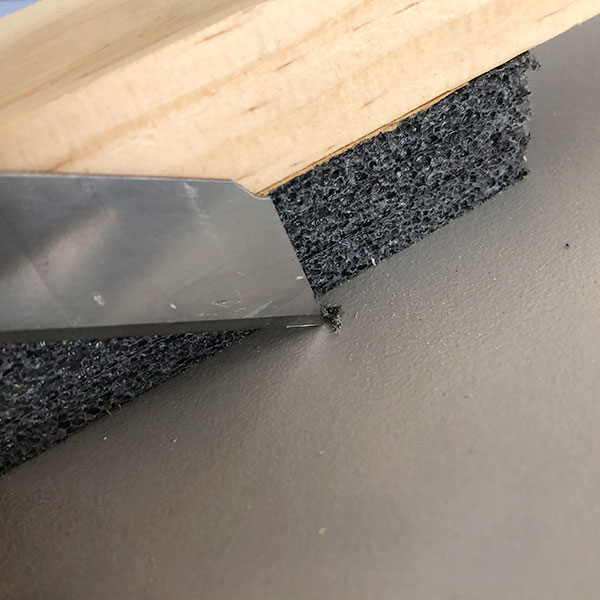
Important Tips: If cutting for packaging or tool insert, cut the pocket smaller than the item to be inserted for a snug fit.
 
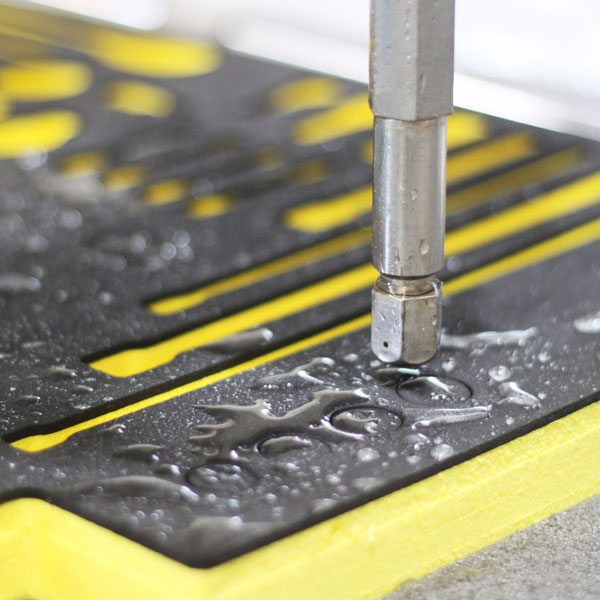
A guide and/or template must always be used and the depth of the router bit must be set and restricted from plunging or rising (unless intended) by a template, sled or similar.
 
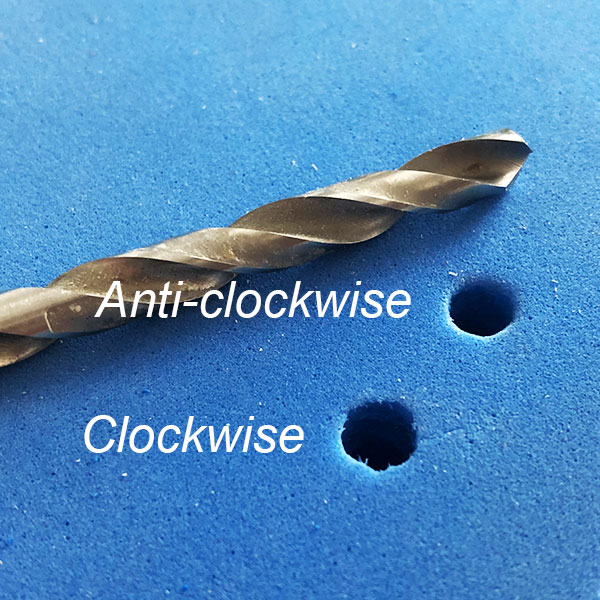
Suitable for: Cutting grooves, channels, pockets, edges, custom shapes.
 
Advantages: Best result for some basic shapes and inserts.
 
Disadvantages: Setup and/or creation of guides, templates, fences etc can take time. Slight movement of foam or user’s grip can risk errors or leave imperfections in the cutting depth like shown in the above image.

Bandsaw, Table Saw, Circular Saw With High Tooth Count

Tips: Consider the thickness of the blade being removed from material, and the number of teeth on the blade.
 
Suitable for: Long basic cuts, change to width, length, angle cuts all with the right guides, straight edges, etc
 
Advantages: Likely to be the cleanest cut DIY method and least prone to error. A clean, straight, square cut will be achieved with the right preparation, setup and guides.
 
Disadvantages: Setup and/or creation of guides, templates, fences etc can take time.

Drilling

Important Tips: Always use a drill guide or a drill block, with the foam secured in place. It’s best to have the drill running at maximum speed before contacting the surface. Drilling anti-clockwise can give a better result.
 
Suitable for: Cutting small circle pockets or holes.
 
Advantages: Only basic tools are required.
 
Disadvantages: High risk of error, different drill bits can have different results and hole’s diameter is often cut about 1mm larger than the drill bit.